Jenkins CI for Rails 4, RSpec, Cucumber, Selenium
ArticleIn this article we will setup CI system on fresh Ubuntu 12.04. I’m basing my manual a lot on Dan Maclains blog on configuring Jenkins:
- http://rails-jenkins.danmcclain.net/#1
- http://danmcclain.net/blog/2011/11/22/using-jenkins-with-rails/
Installation
First install some general stuff:
sudo apt-get install git curl vim
We will begin by adding Jenkins to trusted keys + source list and installing it:
wget -q -O - http://pkg.jenkins-ci.org/debian/jenkins-ci.org.key | sudo apt-key add -
sudo sh -c 'echo deb http://pkg.jenkins-ci.org/debian binary/ > /etc/apt/sources.list.d/jenkins.list'
sudo apt-get update
sudo apt-get install jenkins
This will create Jenkins user, init.d script, and starts jenkins on port 8080
So you should be able to access Jenkins from http://localhost:8080/.
Jenkins system user configuration
In this part we will add rvm to Jenkins user, generate ssh-keys and
add them to github.
sudo su - jenkins     # login as Jenkins user

# add rvm to Jenkins
bash -s stable < <(curl -s https://raw.github.com/wayneeseguin/rvm/master/binscripts/rvm-installer)
Next (still inside Jenkins user) generate ssh-keys for Jenkins user
# generate ssh-keys for jenkins
ssh-keygen
…and add your public key and to desired Github profile
cat ~/.ssh/id_rsa.pub
What I would recommend is to create new Github user (somehing like my_application-bot or build-bot) and
add him to a Github group that can pull repository. This way we will separate Build user on another layer …source code
management layer (just to make thing more secure).
Next (still inside Jenkins user) we will configure git user
git config --global user.name "John Doe"
git config --global user.email [email protected] # yes this should match the github email
Logout from Jenkins user for now.
exit # leave jenkins user
Jenkins Plugins
We need to add several plugins to Jenkins. Open your web-browser and visit http://localhost:8080/pluginManager.
Click on Available tab and search for Git, Github plugin and install.
Note: Github plugin is not a requirement. If you wont use Github webhooks or just prefer to run builds manually you can remove it.
Next go to http://localhost:8080/configure
In Git plugin section set the Global Config user.name Value and
Global Config user.email Value. These should match the Github user
that we set up
In the Shell section set Shell executable to /bin/bash
Configuration for Jenkins run
Note: I basing command below on the fact that Jenkins work directory is in ‘/var/lib/jenkins/`. Change them if different.
As a sudo user in your Build machine run:
echo "export rvm_trust_rvmrcs_flag=1" >> /tmp/.rvmrc
sudo mv /tmp/.rvmrc  /var/lib/jenkins/
chmod 755 /var/lib/jenkins/.rvmrc
echo "[ -s "/var/lib/jenkins/.rvm/scripts/rvm" ] && source "/var/lib/jenkins/.rvm/scripts/rvm" >> /tmp/.bashrc
sudo mv /tmp/.bashrc /var/lib/jenkins/
chmod 755 /var/lib/jenkins/.bashrc
This will crate files in Jenkins work directory which will be loaded for Jenkins system user.
Add Jenkins item
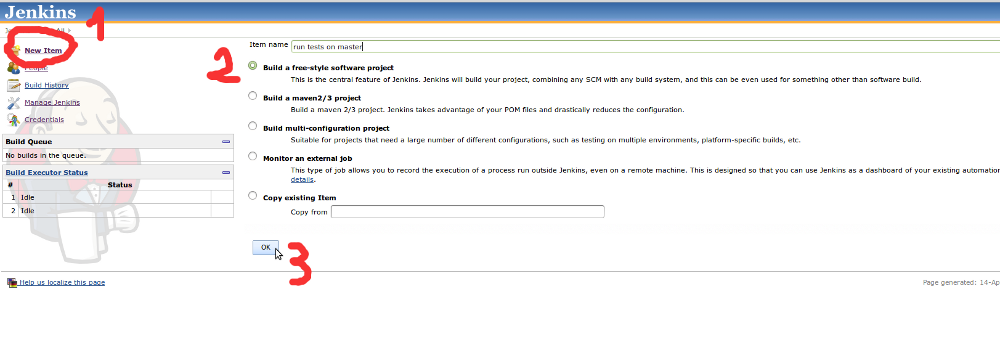
Visit Jenkins website http://localhost:8080/ and choose to New item, name the item (e.g.: run test on master),
select Build a free-style software project option and submit the form.
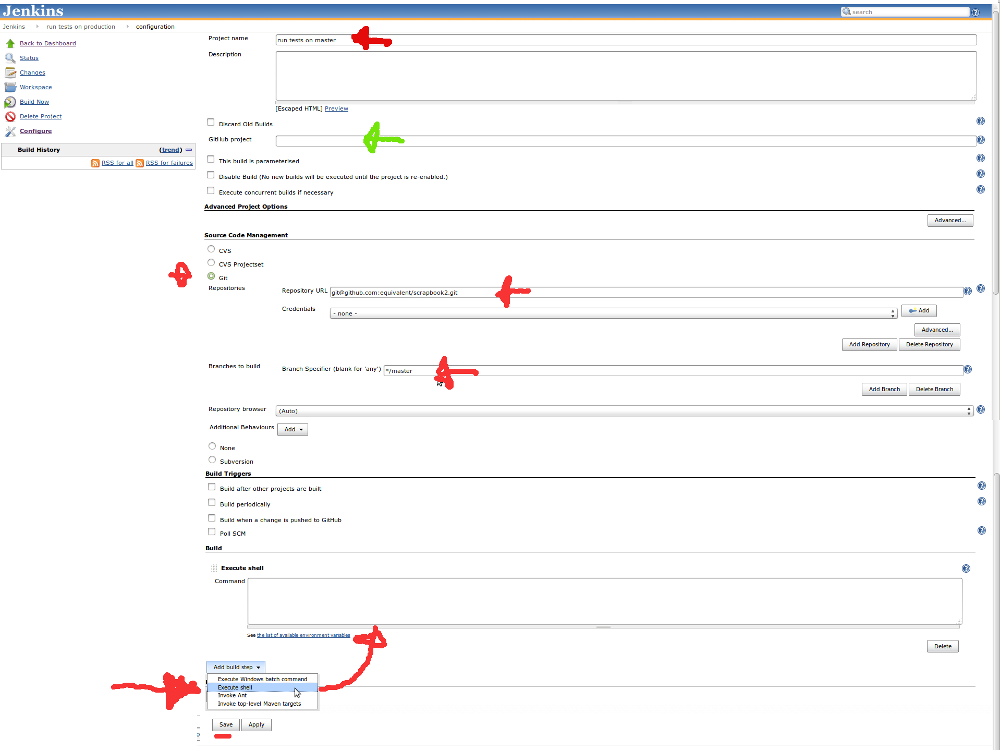
At this point we will skip the Github project item (green arrow), select git as your Source Code Management,
fill in Repository URL (Use the [email protected]/repo.git format) and
provide branch (e.g.: */master). You can choose whatewer branch you
want, if you want to apply this to all branches you can use **, but I rather recommend to crate deferent items for different branches.
In Build section Add bulid step, select execute shell and fill in command textarea with:
source ~/.bashrc                                         # Loads RVM
cd .                                                     # Loads the RVM environment set in the .rvmrc file

rvm current                                              # will display current rvm (debugging purpouse)

cp /var/lib/jenkins/my_database.yml config/database.yml  # copy database yaml to project

bundle install                                           # Installs gems

TEST_ENV_NUMBER=995 RAILS_ENV=test bundle exec rake db:drop
TEST_ENV_NUMBER=995 RAILS_ENV=test bundle exec rake db:create
TEST_ENV_NUMBER=995 RAILS_ENV=test bundle exec rake db:migrate

TEST_ENV_NUMBER=995 RAILS_ENV=test bundle exec rake db:schema:load

TEST_ENV_NUMBER=995 rspec spec

export DISPLAY=:0;                                      # eneble jenkins to run firefox selenium websteps
                                                        # on screen

TEST_ENV_NUMBER=995 cucumber    # if you use cucucmber
TEST_ENV_NUMBER=995 spinach     # if you use spinach
As you can see I’m dropping and recreating database on each deploy. This is because sometimes branches get out of sync.
We will be passing the TEST_ENV_NUMBER variable to our database.yml, more on that in “configure database” section
Configuring database
Install database
In our example we will be using PostgreSQL database. But rest of manual is compatible with MySQL as well
Log back in to your sudo user and install PostgreSQL (if you didn’t do that already)
sudo apt-get update
sudo apt-get install postgresql-9.1 libpq-dev postgresql-contrib
(if you have problems installing PostgreSQL have a look on my scrapbook on PostgreSQL https://github.com/equivalent/scrapbook2/blob/master/postgresql.md )
Setup database configuration file for Rails
create database Yam in Jenkins work directory:
sudo touch /var/lib/jenkins/my_database.yml
sudo chmod 755 /var/lib/jenkins/my_database.yml
sudo vim /var/lib/jenkins/my_database.yml
and add following:
default: &default
  host:    localhost
  adapter: postgresql
  encoding: unicode
  pool: 5
  username: ci_jenkins
  password: MyCoolPassword        # change

test:
  <<: *default
  database: validations_test<%= ENV['TEST_ENV_NUMBER'] %>
As you can see here we are using the ENV['TEST_ENV_NUMBER']. This way we will be able to run several different items at a same time (e.g.: testing custom branch & deploying staging at a same time) and even parallel tests.
Add database user for Jenkins
So lets login to PostgreSQL:
# from sudo user
sudo -u postgres psql
…and create ci_jenkins database user.
Because this build machine wont store any business data it’s ok for our user to be SUPERUSER, therefor we wont have to give him permissions individually for database and this way we can drop and create database as we want.
CREATE USER ci_jenkins WITH PASSWORD 'MyCoolPassword';
ALTER USER myuser WITH SUPERUSER;
First Jenkins Build
Visit Jenkins from browser again http://localhost:8080/ and schedule the build

Jenkins accessible from outside
We will use NginX as a Proxy server in front of Jenkins
Install NginX (unless you have it already)
# as a sudo user
sudo add-apt-repository ppa:nginx/stable --yes
sudo apt-get -y update
sudo apt-get -y install nginx
Next create NginX site configuration for Jenkins:
sudo touch /etc/nginx/sites-enabled/jenkins
sudo vim /etc/nginx/sites-enabled/jenkins
…and paste into it:
# /etc/nginx/sites-enabled/jenkins
upstream jenkins_server {
    server 127.0.0.1:8080 fail_timeout=0;
}

# all http requests will be redirect to https

server {
  listen 80 default;
  return 301 https://$host$request_uri;
}

server {
  listen 443 default;
  server_name my-awesome-build-machine.com;  # host/domain where you will
                                             # access the build machine
  # server_name 231.123.123.123;             # ...or if you use IP address

  ssl on;
  ssl_certificate     /etc/nginx/ssl/jenkins/server.crt;
  ssl_certificate_key /etc/nginx/ssl/jenkins/server.key;

  location / {
    proxy_pass http://jenkins_server;
    proxy_set_header        Host $host;
    proxy_set_header        X-Real-IP $remote_addr;
    proxy_set_header        X-Forwarded-For $proxy_add_x_forwarded_for;
    proxy_connect_timeout   150;
    proxy_send_timeout      100;
    proxy_read_timeout      100;
    proxy_buffers           4 32k;

    client_max_body_size    8m;
    client_body_buffer_size 128k;
  }
}
You can find alternative NgenX configurations at http://git-scm.com/book/en/Customizing-Git-Git-Configuration. Especially if you don’t want https use different one.
next generate those Self Signed Certificates under
/etc/nginx/ssl/jenkins
sudo mkdir -p /etc/nginx/ssl/jenkins/
cd /etc/nginx/ssl/jenkins/

sudo openssl genrsa -des3 -out server.key 1024          # generate private server key with password
sudo openssl req -new -key server.key -out server.csr   # generate signing request form key
                                                        # this will promt you to fill in some inforation
                                                        # about "sign" company
                                                        # most import is the Common Name !!!
# Common Name []:my_application_name.com                # enter here the official name, domain or IP

sudo cp server.key server.key.org
sudo openssl rsa -in server.key.org -out server.key     # remove password from key

sudo openssl x509 -req -days 365 -in server.csr -signkey server.key -out server.crt  # sign the certificate (365 days)
Note:
when you run nginx -V output should say TLS SNI support enabled,
othervise NginX don’t support SNI.
NginX how to generate Self Signed Certificate stolen from this article
Next make sure the main NginX config etc/nginx/nginx.conf includes your configuration
# /etc/nginx/nginx.conf
http {

  # ...

  include /etc/nginx/sites-enabled/*; #this should be there

  # ...
}
Also remove the default configuration file if it exist
in /etc/nginx/sites-enabled/
Test your NginX configuration via sudo /usr/sbin/nginx -t and if it’s
successful restart NginX:
sudo service nginx restart
…and visit you build machine domain / IP address (maybe from another computer)
- If you stuck with NginX you can have a look on my NginX scrapbook
- My articlo on how to install NginX from source
F.A.Q.
How to restart Jenkins
From webinterface: http://Jenkins_url/restart
Console restart sudo service jenkins restart
I want Basic Auth in front of Jenkins
if you want Basic Authentication (.htpasswd) prompt on NginX level than all you have to do is to change NginX configuration for Jenkins site:
# /etc/nginx/sites-enabled/jenkins
server {
  # in our example under the "listen 443 default;" server
  # ...

  location / {

    # ...

    auth_basic "You shall not pass !!!";
    auth_basic_user_file /etc/nginx/security/htpasswd;

    # ...

    proxy_set_header        Authorization "";  # this one is important
                                               # read the "Basic auth NginX - Jenkins triggering Jetty basic auth"
                                               # F.A.Q. section for more info
  }
}
Changing Jenkins port
vim /etc/default/jenkin
change HTTP_PORT=8080 to whatever you want. I’ll need port 8080
for another application, so I’ll use unassigned port 9700: HTTP_PORT=9700
Enabled security and no user can access
If you mange to enable Jenkins security but forgot to create users, or
you forgot passwords to all of your Jenkins webinterface users, just change
<useSecurity>true</useSecurity> to <useSecurity>false</useSecurity> in
/var/lib/jenkins/config.xml
User as Administrator
in /var/lib/jenkins/config.xml make sure that your user has a line
<permission>hudson.model.Hudson.Administer:username</permission>
Basic auth NginX - Jenkins triggering Jetty basic auth
If you manage to set up NginX in front of Jenkins with basic auth (.htpasswd) and on Jenkins you created Web user own database credentials. It may happen that now when you try to access the page you will get NginX basic auth popup and after successful login you will get another basic auth pop up (w.t.f ?)
When you fail the second popup and you get:
HTTP ERROR 401

Problem accessing /. Reason:

    Bad credentials

Powered by Jetty://
Reason for this is tat you forgot to tell NginX to proxy pass your Authorivation header. Webserver (Jetty) that Jenkins is running on will susspect you failed basic auth unless you pass this header:
# /etc/nginx/sites-availible/jenkins
# ....
proxy_set_header   Authorization "";
# ....
This should fix it.
sources:
- https://wiki.jenkins-ci.org/display/JENKINS/Jenkins+behind+an+NGinX+reverse+proxy
- https://wiki.jenkins-ci.org/display/JENKINS/Disable+security
- http://jenkins-ci.361315.n4.nabble.com/Cannot-Log-Into-Jenkins-td4096436.html
- https://wiki.jenkins-ci.org/display/JENKINS/Jenkins+behind+an+NGinX+reverse+proxy
Entire blog website and all the articles can be forked from this Github Repo